.png)
Note: This blog post was first published in May 2019. It has been updated as of March 2023 to include some of the most up-to-date content available.
Sometimes it’s the features in Sage 300 that we don’t always notice or think about, that can help us get more out of the system and make work a littler easier.
From tips for working with the ERP software more effectively, to how you can get a deeper insight into your business processes, here’s four new tips and tricks that end users of Sage 300 like yourself can take advantage of.
1. Make Use Of The Finder
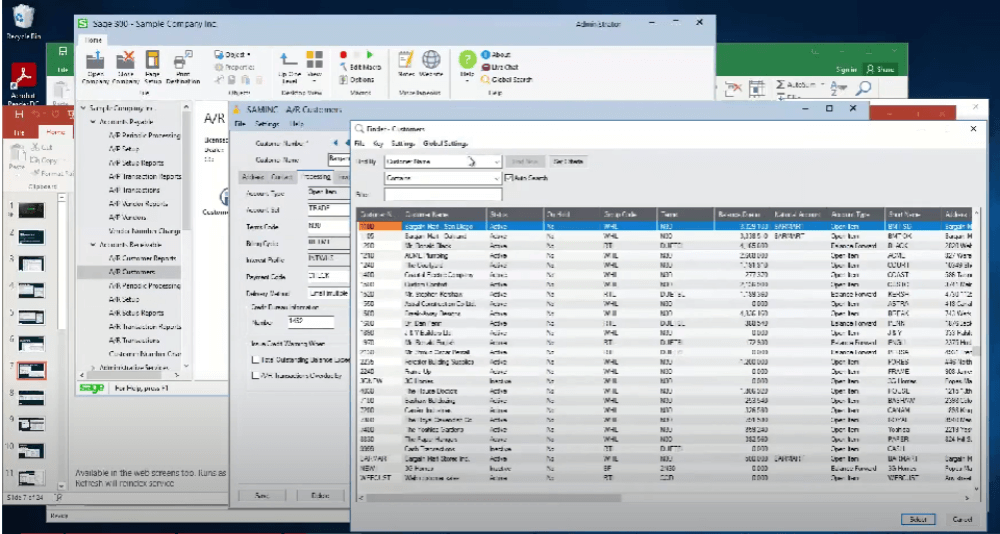 Making use of the Finder. Source: Sage Group
One of the most efficient tools that you can use to locate the records you need quickly is the Finder. To activate the Finder, look for and click on the magnifying glass icon in the field you’re currently using, or alternatively press the F5 key.
Once you’ve done so, it will pull up a Finder window that’s specific to the field you’re currently using. You can use it to search for the records you need in a number of ways.
For example, you can use the Set Criteria button on the Finder screen, to narrow down the values you need. This will pull up all the records that contain matching values with your criteria.
You can then export the full list of results by selecting File/Export.
The next time you click on the same field where you used the Finder, Sage 300 will remember the settings that you used from your previous search. This includes the fields that you searched by, as well as any criteria that you set.
2. Speed Up Your Work With Keyboard Shortcuts
Navigating between various windows on Sage 300, and doing data entry especially for a large volume of transactions, can be such a tedious task. The need to switch between your mouse and keyboard constantly not only slows you down, but can break your concentration as well.
However, Sage 300 supports a set of keyboard shortcuts and ‘hotkeys’ which you can take advantage of to navigate the ERP software much more quickly and efficiently., and thus save so much time.
Here’s a list of some of the hotkeys you could probably make the most use out of;
Navigation
- Page Up - Go the first (top) record visible in a list.
- Page Down - Go to the last (bottom) record visible in a list
- Ctrl/Page Up - Go to the first record in a Finder list.
- Ctrl/Page Down - Go to the first record in a Finder list.
- Ctrl/Tab - Move out of a grid or list to the button or field following the grid or list.
- Ctrl/Shift/Tab - Move out of a grid or list to the button or field directly above the grid or list.
- Home - Go to the first entry in a list.
- End - Go to the last entry in a list.
- Alt + C (or Alt + F4) - Close a form or dialog box
- Alt + E - Open the Set Criteria dialogue box to specify records that will be displayed in the Finder
- Up Arrow/Down Arrow - Go up or down one line in the grid
- Esc - Cancel/close a pop-up window (for example, the calendar, or a screen opened with the Zoom button.)
Data Entry
- F1 – Opens Help files
- F4 – Displays the calendar for a date field
- F5 – Opens the Finder
- F7 – Activates the “Go” button found on many screens, which refreshes the record
- F9 – Opens a detail entry screen, which displays more information from the record
- SHIFT + F9 – opens a second level detail (or Zoom Detail) from a detail form
- Insert – Inserts a blank row in a grid to add a new record
- Delete or DEL – Deletes the selected row or record
- Alt + S – Save changes to the displayed record
- Alt + A – Save a new record
- Alt + P – Prints records
3. Easily Differentiate Between Multiple Companies
%20(1).png?width=1000&height=666&name=Color%20Coded%20Companies%20(1)%20(1).png) Color-coded companies feature. Source: Sage Group
Color-coded companies feature. Source: Sage Group
If you’re managing multiple companies within Sage 300, it can quickly become confusing for you to tell the difference between which company’s set of data you’re currently working with at any one time.
To make it easier for yourself, what you can do is to assign a different colour for the window borders for each company you’re working with in Sage 300. This helps you distinguish at a glance which comnpany’s data you’re currently working with.
To do this, go to Database Setup, pick the company you want to assign a unique colour to, and select Edit to select a colour for that company. Alternatively, you can choose the Assign Colour Automatically option to immediately give each of your companies its own colour.
4. Sage Intelligence Reports
%20(1).png?width=1000&height=440&name=Sage%20intelligence%20reportds%20(1)%20(1).png)
Sage Intelligence Report Utility Feature. Source: Sage Group
Sage 300 can also provide you with an in-depth insight into your business processes, thanks to its Sage Intelligence Reports feature. To make use of it, you can download the Report Utility tool here.
The Report Utility provides you with a set of ready-to-use reports that have already been formatted for you. You can use them to visualise your data within Sage 300, or alternatively download it into an Excel spreadsheet to work with the data.
If you need additional report templates for your business reporting needs, you can find them at the Report Template Utility or the Free Report Templates group on the Sage Intelligence Community.
Carry Out Your Work More Efficiently With These Tips And Tricks For Sage 300
With these tips and tricks, you can navigate Sage 300 more efficiently, do more work in less time, always know which set of data you’re working with when managing multiple companies, and derive business intelligence from the data stored in your instance of Sage 300.
And that means you’ll be able to get that much more value out of the ERP software in your day-to-day work.
To learn more about Sage 300 and the capabilities it brings to the table for your business, click the image below to download our free solution brief now.
Tips and Tricks for Sage 300 ERP (formerly Accpac) End Users (Published 2019)
Sometimes it’s the features in Sage 300 that we don’t always notice or think about, that can help us get more out of the system and make work a little easier.
From time-saving tips to settings that help enhance accuracy and security, here’re five tips and tricks Sage 300 users can take advantage of.
1. Secure Access to General Ledger (G/L) Accounts
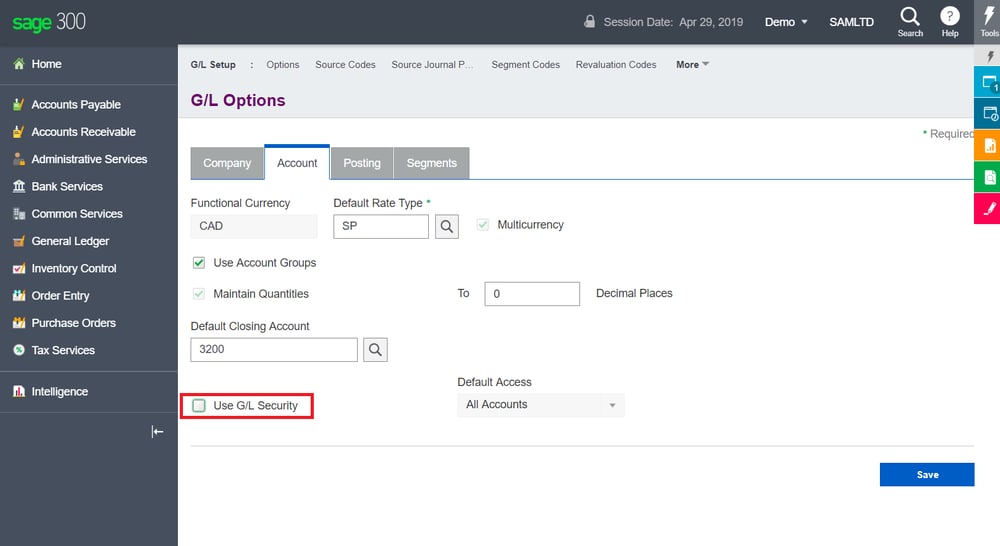
If you use Sage 300cloud v2018 and newer, you can now enable G/L security using the web screen. Source: Sage
Useful if you need to maintain different levels of access to your company’s G/L accounts, e.g. senior management need access to all accounts, middle managers shouldn’t have access to senior management accounts, etc.
To turn this option on:
- Go to General Ledger > G/L Setup > Options and tick Use G/L Security.
- Log out and log back into Sage 300 for the change to take effect.
You should now see an Accounts Permissions option under General Ledger > G/L Accounts. This is where you can control user access by G/L account or segment.
Can be enabled through the G/L web screen of Sage 300cloud version 2018 and newer.
2. Post Provisional Batches to your G/L
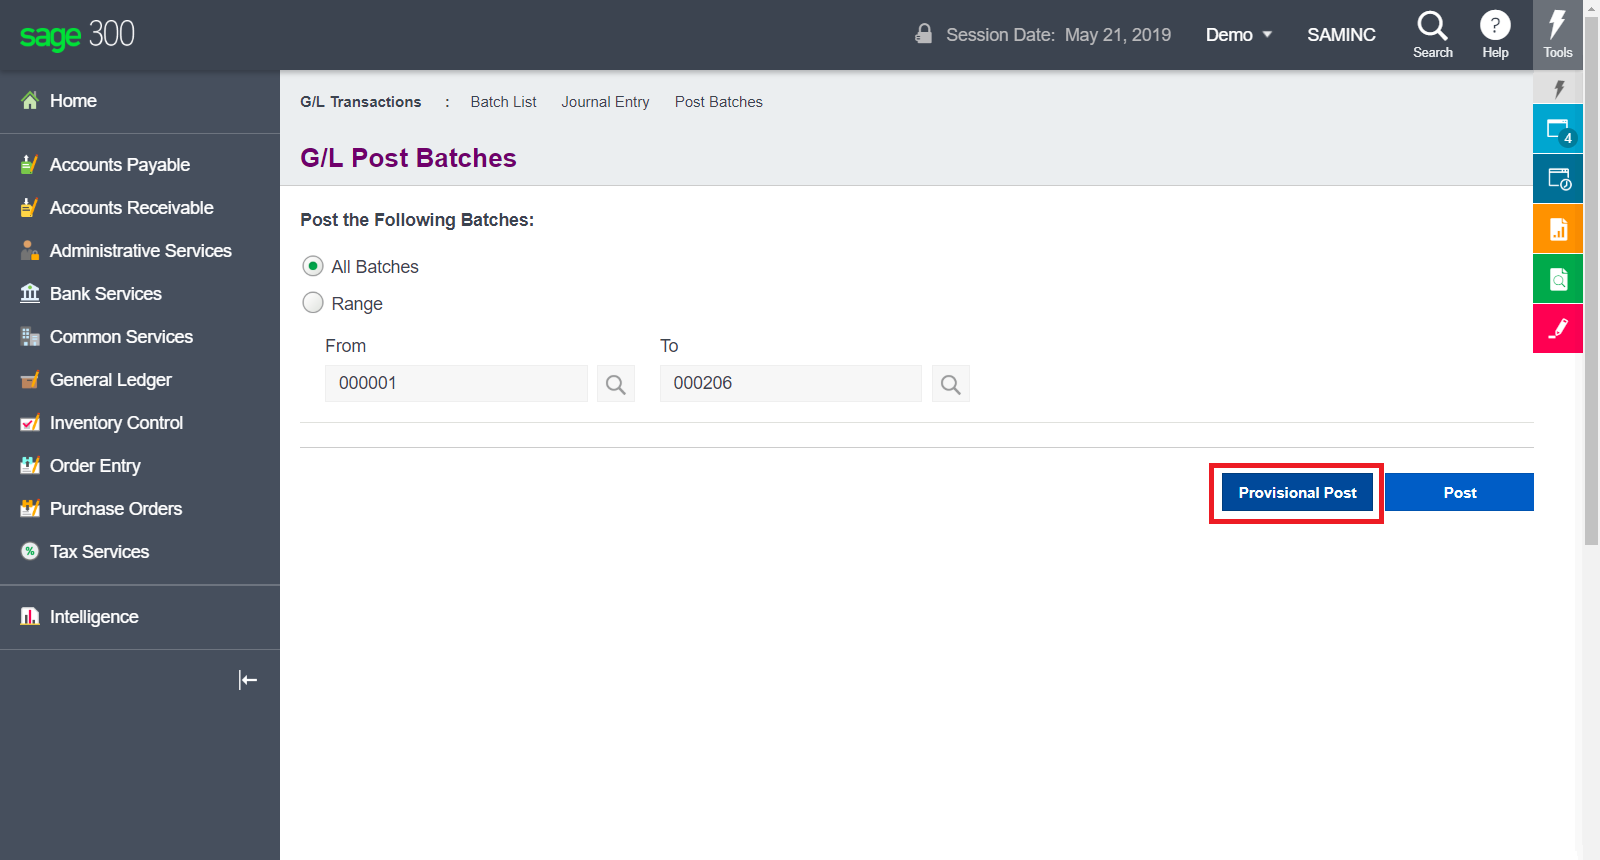
Provisional batches are helpful if you need to test the effects on your G/L before actually posting them. Source: Sage
Provisional G/L batches are for you if you’re creating month-end adjustment entries and need to ensure everything tallies first.
Also useful if you’ve a new-on-board accounts intern and you want to review their entries just in case.
Unlike ordinary G/L batches, they can be edited before they’re posted permanently.
You can either:
- Post provisional batches one by one. Head to General Ledger > G/L Transactions > G/L Batch List.
- Or, post all batches – or a range – provisionally. Navigate to General Ledger > G/L Transactions > Post Batches.
If you don’t already have it enabled, turn it on by heading to General Ledger > G/L Setup > Options > Posting tab and check Allow Provisional Posting.
You can run this on both the classic desktop program and Sage 300cloud’s G/L web screen.
3. Choose How You Want Item Costing to be Processed
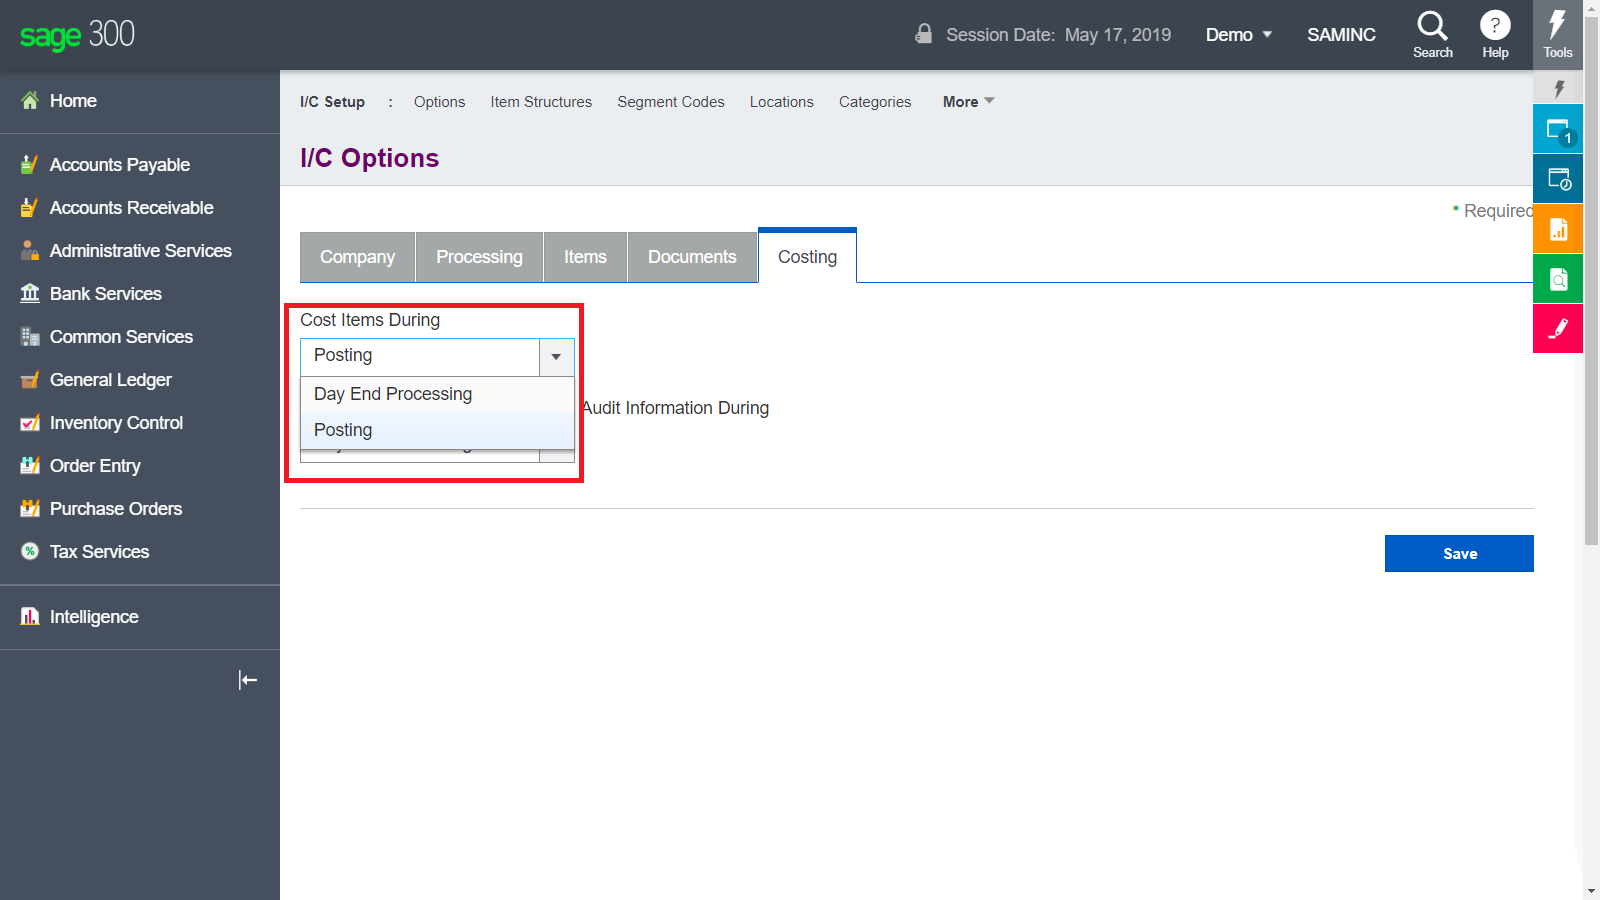
Cost items during Day End Processing or Posting: the choice is yours. Source: Sage
By default, items are costed during Day-End Processing. But you can also have items costed when you post them.
Likewise, there’s the option of having subledger transactions and audit information created during posting as well.
This is useful when, e.g. management expects real-time item costing data.
You can switch between either mode even after setup, though if you choose to have items costed on posting, you’ll need to run Day-End Processing first to make sure everything is costed properly.
To enable Cost During Posting and Create Subledger Transactions and Audit Info during Posting, head to I/C (Inventory Control) Setup > I/C Options > Costing tab and choose Posting from the dropdown menu.
Take note that costing items during posting can take up a lot of system resources though – which means it’ll take a longer time to post sales and purchase orders.
So if you plan to switch to Costing During Posting, be sure to give a heads up to your colleagues.
Can be enabled through the classic desktop program or through Sage 300cloud’s I/C web screen.
4. Attach PDF Reports to Emails Automatically
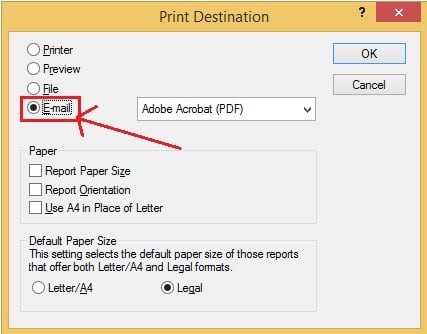
You can print reports, preview them in Sage 300, export them to a file, or attach them to an email. Source: Greytrix
Forget exporting reports and then having to hunt for them in File
Explorer. With Sage 300, you can attach PDF reports to new emails, direct from Sage 300.
- Go to Print Destination (blue envelope on the right-hand corner of the bottom taskbar) > choose E-mail and choose Adobe Acrobat (PDF).
- Select Print when you get to the document you want to export (e.g. customer record).
- The PDF file will be generated and attached to a new email in Outlook.
This function exists only in the classic desktop program.
5. Review Data Integrity Checker Log without Printing Everything
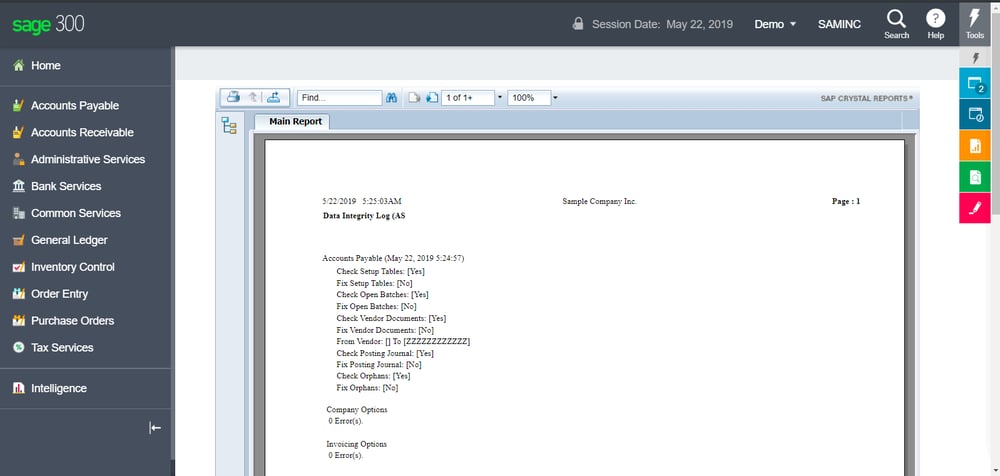
If you run a Data Integrity check in Sage 300cloud, the results show up in a Crystal Reports viewer automatically. Source: Sage
Running a data integrity check regularly is recommended, and you can review the results by printing them.
But the log can be quite long, especially if you’ve got the full range of modules implemented.
Want to review the results on screen instead? The Data Integrity Check saves a text file log to your Shared Data folder after it’s been run. Here’s how you can access the log:
- Get the shared data path by selecting Help > System Information.
- Open the path in File Explorer and head to the COMPANY folder.
- Open the folder of the database you ran the integrity check in. The final path might look something like this: D:/Program Files/Sage/Sage 300/COMPANY/SAMINC.
- You’ll find an ERRORS text file, which contains all the details of the integrity check.
If you’re running Sage 300cloud, you can run the data integrity check through the web screen the same way. But the log opens in a Crystal Reports viewer instead, so you can skip these steps. You'll also have the option of printing the report if you prefer.
Sage 300 (formerly Accpac): Robust Accounting Functionality
With features like these, you can save time, enhance security, and improve accuracy.
It all goes back to the value of Sage 300 for small and medium-sized enterprises (SMEs).
More than the strong financial management capabilities it’s well-known for, Sage 300 connects the important parts of your business – finance, operations, and inventory – helping you make more effective decisions, faster.
To learn more about Sage 300 and its capabilities, click the banner below to get your free copy of the latest Sage 300 solution brief now.